Get Paid To Promote, Get Paid To Popup, Get Paid Display Banner

Sunday, March 29, 2009

Harley Davidson Pecos Motorcycle Boot Review

Harley Davidson Pecos Motorcycle Boot Review

When I was getting geared up for the Motorcycle Safety Foundations Basic Rider Course I was looking for a black biker boot that looked more like a cowboy boot than the regular bikers engineer boot. One day at lunch I was browsing a local bike shop in Grapevine Texas called Biker Alley, which has since closed, and found what I was looking for. They were Harley Davidson brand and were a cross between an engineer boot and a cowboy boot. The price was reasonable and I purchased a pair.

The boots looked great but after wearing for several hours in the rain they became soaked and my feet were all wet. So, I went looking for something to make then more water repellent. I picked up a can of Penguin brand Himalaya Wax and coated them excessively. Then I polished them up to a beautiful black leather shine. Himalaya Wax is made of beeswax and is very water repellant. My feet have been dry since, however I have not had them immersed in water for any great length of time.

I have had the Pecos boots now for over a year and they have held up well. I do not wear them every day. Usually I wear them on Fridays, on days that are raining, or when it looks like it might rain. The leather has held up well, even the top of the left one, used for up shifting. They have picked up some minor scuffs, but do not look that bad for not having polished them again. For sturdiness and protection these boots are equipped with an inside metal support shank.

The Harley Davidson boots are as comfortable to wear as any good quality made boot should be. Rumor has it that Wolverine manufactures these boots for Harley. There is a metal insignia plate with the Harley Davidson Logo on it located on each heel. The tooled leather straps with steel harness hoop are riveted together. As a nice touch Harley Davidson Motor Co written around the head of each rivet. The uppers are constructed of supple full grain leather. The stitching is of good quality and the pull tabs have lasted with me using them to pull and tug the boots on every time I wear them.

The soles of the Harley Pecos boots are made of Goodyear welted construction. A Goodyear welt construction is good for water protection and the possibility of resoling. The Dual-density rubber/EVA outsole is oil, water, and slip resistant. The traction of the Pecos boot is good on cement and blacktop roads, but get them on wet painted or polished smooth cement and they are not so slip resistant. Part of the tread pattern is bright orange in color and is very aggressive. The Harley Davidson logo is embossed on the sole shank towards the heel. There are parts of the sole that are starting to wear smooth from all my walking and riding in them.

The interior of the Pecos boot is lined with a full length cushion sock made of Taibrelle. This liner helps wick perspiration away from your feet. The insole is removable and is made of dual-density polyurethane for comfort. These boots are very comfortable to wear, but may take some time to get used too if you have never worn boots with a true heel on them.

If you enjoy wearing a comfortable pair of cowboy boots but want something to ride your motorcycle in, these boots fit the bill. I have enjoyed wearing and riding in these boots. They offer a lot of protection for your feet, ankles, shins, and calves. Torch gives the Harley Davidson Pecos Motorcycle Boots a M.M.M Rating of 8 on a scale of 1-10.

Ride on,
Torch


Reblog this post [with Zemanta]

Sunday, March 22, 2009

Stebel Nautilus Compact Dual Tone Horn


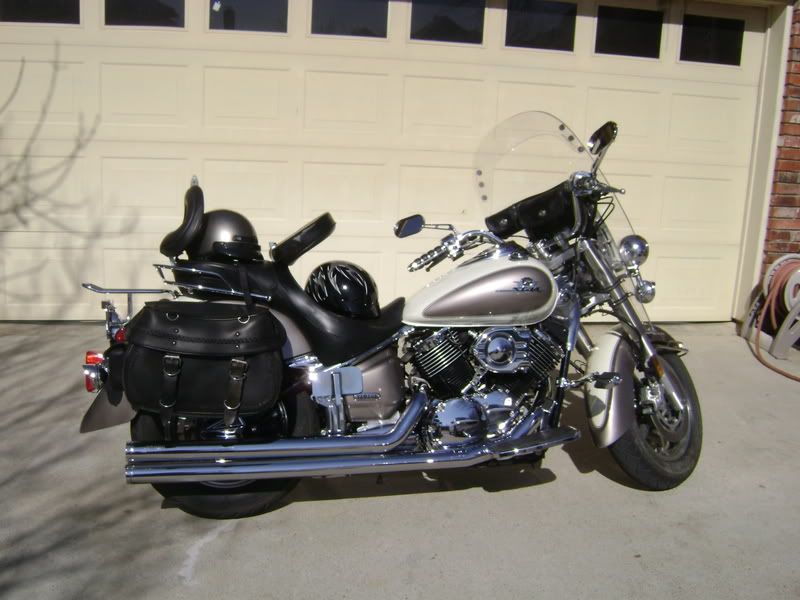
Stebel Nautilus Compact Dual Tone Horn Installation on 2003 V-Star 1100 Classic & Review

One of the items on my Christmas list last year was a Stebel Nautilus Compact Dual Tone Horn for my 2003 V-Star 1100 Classic, named Mistress. Oh, did I mention they come in chrome? When Christmas came around my dear wife informed me she had ordered the horn I wanted and an installation kit to go with it. I could hardly wait for it to come in.

It came in the next week. I learned that my wife had ordered the Stebel Nautilus Compact Dual Tone Air Horn from Twisted Throttle. She also had ordered their Plug-N-Play wiring installation kit. I checked to make sure everything was there, and it was. The Horn itself came with a relay, one mounting bolt, one mounting nut, one mounting bracket adapter for mounting the horn separate from the small air pump, and directions. Twisted Throttles wiring kit came with, pre-wired relay connector, horn ground wire, two blue Posi-Lock connectors, one 30 amp ATC fuse, one six inch wire tie, six four inch wire ties, wiring directions and electrical schematic.

I decided to install the horn when I replaced the battery on my V-Star. I started by removing my Corbin Dual Tourer seat. That is accomplished by removing both seat lean backs and the nut and washers at the rear of the seat. Then I lifted the seat assembly up from the rear while pulling the assembly rearward unhooking it from the seat holders. I made sure the fuel valve was turned to the off position, removed the fuel line, and disconnected the wiring harness going to the instrument cluster, removed the two bolts from the fuel tank bracket, removed the front ignitor unit panel quick fastener and removed the fuel tank.

With those out of the way I removed the battery side cover, disconnected the negative battery cable and then the positive cable. I went on and replaced the battery which you do not have to remove to install the Stebel Nautilus Compact Dual Tone Air Horn. I opened the wiring harness and horn packages and spread everything out ready for the install.

First I installed the relay and fuse into the wiring harness setting the relay part of the harness near where I would be mounting it under the seat. I routed the red power wire down to the battery positive cable area ready to hook up. I snaked the black and blue wires, which come twisted together, from the relay along the factory wiring harness route up to where the Original Equipment horn is located. I had previously replaced the OEM horn with a Fiamm Freeway Blaster Horn.

This is where I deviated from the instructions that came with the wiring kit. I wanted to keep the Fiamm Freeway Blaster horn hooked up so I could use both the Fiamm and the Stebel Nautilus Compact at the same time. I accomplished this by employing two Quick Splice connectors that I had on hand in my electrical supplies. I attached one to the positive, and one to the negative OEM horn wires. These simply crimp connect onto the wire using pliers. The center of the connector pinches through the wires insulation making the connection for the attached female lug. This made easy hook ups for the wiring kits male spades on the black and blue wires, blue to the positive brown horn wire and black to the negative pink horn wire.

Next I snaked the yellow wires from the relay along the factory harness under the fuel tank area and down to where I was going to mount the Stebel Horn by the rear brake master cylinder. Now it was time to mount the horn assembly itself. I had picked up a scrap piece of bracket and now needed to tweak it into the correct shape and make the mounting hole for the horn larger to fit the bolt that came with the horn.

I held the metal and horn up together where I wanted to mount the horn assembly next to the rear brake master cylinder to check clearances and get some idea where to bend the bracket. I then bent the metal bracket and re checked clearances. That done, I drilled out the hole in the end where the bolt from the horn assembly would go. The other end already had a hole to mount to the rear brake master cylinder bracket. I then removed the brake master cylinder mounting bolt and added in the new horn bracket and horn ground lead supplied by the wiring kit, and reinstalled.

Now that I had the new horn mounting bracket in place I attached the Stebel Horn assembly to it using the supplied mounting bolt and nut, making sure the horn was mounted in the correct orientation and angle as per the instructions. I hooked up the yellow power wire from the relay to the Stebel Horn power connector. Next, I connected the negative black wire from the ground at the rear brake master cylinder and the just added horn bracket, to the negative connector of the Stebel Horn.

I finished up installing the new battery by connecting all the positive leads and then the negative leads. I attached the Stebel Horn relay to the frame using a tie strap. I reinstalled the fuel tank and reconnected the electrical harness. It was time to test the horn before I put everything back together on the bike. I turned the key to the on position and hit the horn button. There was a slight delay after hitting the horn button from when the Fiamm Freeway Blaster starts and the Stebel Nautilus Compact Dual Horn kicks in. It takes a split second for the Nautilus’s air pump to get pressure to the horn. It’s worth the wait.

The Stebel Nautilus Compact Dual Tone Horn is loud. It is rated at 139 decibels and I believe it’s every bit of that. It is way louder than the Fiamm Freeway Blaster. It sounds like an 18 wheelers horn. Here is an excerpt from the Twisted Throttle website:

“Keep this in mind: sound energy doubles for every 3 points you go up in the decibel scale. It means that the Stebel Nautilus horn, which produces 139 dB of sound, puts out a LOT more sound than these popular horns: - 800% of the sound energy of the more expensive 130dB FIAMM Freeway Blaster; - 600% louder than the $140, 130 dB Pro Pad Mini Beast horn; - 650% louder than the $179, 128dB Rivco dual trumpet horn.”

Lastly I used the supplied wire ties to secure all loose wiring out of the way. I buttoned up the bike in reverse order of the disassembly and got it ready again to ride.

Just the other day I had the opportunity to use the Nautilus Compact Air Horn. It was on my commute home westbound on SH183 around Hurst Texas. A vehicle whose driver was not paying attention, was unaware or uncaring started drifting over from the center lane into the fast lane while I was in it. I guess even with his window down he could not hear my
Cobra exhaust next to him above all the traffic noise. I hammered on the horn button and the Stebel responded with a very loud honk. He stopped moving into my lane but was still straddling the white line so I just sped up and got out of there.

The Nautilus Horn worked as designed and I was very happy with how loud it is above the sounds of the traffic. The installation on my V-Star 1100 Classic was not that complicated. It can be installed by someone with an average mechanical ability and electrical aptitude. Torch gives the Stebel Nautilus Compact Dual Tone Air Horn a M.M.M. Rating of 9 out of 10.

Ride on,
Torch
Reblog this post [with Zemanta]

Automotive Forum


Tuesday, March 17, 2009

Attack of the U.F.M.


Attack of the U.F.M.

It all started on a sleepy autumn morning. I rode to work early, usually getting up around 4:30 – 4:40 am and left around 5:00 – 5:10 am. Needless to say I’m usually only partially awake at that time in the morning. I don my leathers and head out to the garage.

I opened the garage door and backed Mistress, my V-Star1100 Classic, out and got the rest of my gear on, gloves, face mask, clear riding glasses, and half helmet. I tucked my lunch inside my right saddlebag. It was cold enough outside that I had trouble keeping the glasses from fogging up when I breathed out my nose. I closed the garage door and proceeded to start the bike.

First I turned the ignition key all the way on. I made sure the choke, (fuel enrichment knob), was turned all the way on. Then, I made sure the fuel cut off valve was turned down to the on position remembering that if I do not turn the fuel knob back on, I will not make it out of my neighborhood with out running out of fuel and stalling the bike. Don’t ask me how I know. I pressed the cut of switch to the run position and hit the start button.

Mistress’s 1100 V-Twin roared to life. With the Cobra exhaust, you can bet my neighbors know when I leave in the morning. I slid the fuel enrichment knob, (works like a choke), over to idle her down some and headed carefully out of my driveway onto the dark, damp streets.

It was a cold, dark and foggy Monday morning. I turned out of my neighbor hood and headed eastbound on Cheek Sparger Road. I straightened out from the turn and started to accelerate. Just then, I caught some movement just barely visible at the far reaches of the headlamp and riding lights off the side of the road. At first I didn’t pay to much attention to it, thinking it’s probably just a rabbit on the side of the road hopping around.

Then I noticed the anomaly is headed perpendicularly to my track on the road and will cross right in front of me. That’s when I spotted the glowing white beady eyes of this creature fixated on my Mistress and myself, reflected from the lights. As I got closer I could make out its size. It was larger than an alley cat and more like the size of a small dog. Now I could make out some large teeth and huge fangs in a pointy snout and large whiskers with foam trailing out the corners of its mouth.

Just then I realized what the Unidentified Flying Marsupial was. It was a very angry opossum running at full gallop across the road and headed straight for me. It looked like it was out for blood. For all I knew it could be rabid. I raised the angle on my right wrist and Mistress responded by slowing down some, both of us hoping to throw the attackers timing off. I just new it was going to either try to get up underneath my front tire and knock me off my bike or just jump straight up for a death grip on my throat.

My change in speed to throw off the timing ploy did not work. My next tactic was to aim my V-Star 1100 right at it. Mistress nodded in agreement. The logic in this approach was that, if I tried to hit a moving target, more than likely I would fail. The gargantuan opossum was at a full out run and just fixing to spring at me, its claws glistened in the riding lamps, when its head hit my front tire. It made a hollow thump type sound.

At this point neither one of us could adjust the momentum we had built up. The killer slid underneath the path of the bike. I could feel the rear of the bike lift up as the rear tire ran over the marsupials head. I knew it was its head because if it had been its body the back end of the motorcycle would have bounced up a lot higher.

In a flash it was over. Mistress and I had thwarted a deadly attack from a killer opossum and barely survived. I tried to glance back behind me and saw nothing on the roadway. But it was foggy and dark so I might not have been able to see it. I called my wife when I got to work and asked her if she had seen anything in the road, she leaves for work right after me, she had not. I looked closely again at the scene of the assault on my way home and saw nothing. The Attacker had made a clean get away.

Opossums are the other brown meat and tastes like chicken, I would imagine. Otherwise, they can be just another large, rodent looking, Unidentified Flying Marsupial obstacle in the road. Most of the time, you only get to see them with their little feet sticking up stiffly. Yep, they are just another obstacle you have to watch out for while riding a motorcycle in the Texas suburbs.
What is the moral of this story? Be prepared at any time, any place, and any conditions to react to changes in road conditions or obstacles in your path. Also remember, not all obstacles hold still for you. Sometimes obstacles have a mind of their own.

Ride on,
Torch
Reblog this post [with Zemanta]